Friday, November 14, 2014

Kraftin' Kimmie Stamps - Sneak Peeks Day Two!!!

Welcome back for Day TWO of the Kraftin' Kimmie Stamps NOVEMBER previews!!! The girls are having a FAIRY fun time playing with two MORE new sparkly new Moonlight Whispers stamp sets by Annie Rodrigue!! You loved the two from the last release so we have no doubt you'll love these pixies too!!

Today the Krafty Girls and guests are thrilled to share with you....ICY FAIRY and SNOWBALL FAIRY!! You'll find so many gorgeous creations on today's hop featuring both new images and sentiments from the sets! We know you are just going to LOVE these awesome ladies and be inspired by all the incredible designs!! Each set comes with the fabulous fairy image stamp, plus coordinating sentiments!! 
 
Below you will find all the Krafty Girls & Guests who have goodies to show you today and while you're visiting their blogs, be sure to leave some love at each stop because one lucky stamper is going to WIN some $$ to the Kraftin' Kimmie Stamps Shop!! Woohoo!!!
 
ALL of our NOVEMBER stamps will be available on Saturday night at the Kraftin' Kimmie Stamps Shop!!! Be sure to join us for an hour of celebrating the new stamp sets, fun and prizes at our LIVE ONLINE RELEASE PARTY!! Come hang out with the Krafty Girls, Guests and Kimmie!!
 
Happy hoppin'!!


Thanks for stopping by today and hope to see you back again tomorrow! Hugs!


Thursday, November 13, 2014

Kraftin' Kimmie Stamps - Sneak Peeks Day one!!

Hey everyone!! Welcome to day ONE of our NOVEMBER Kraftin' Kimmie Peeks!!! We have so many goodies in store for you and we've been dyin' to share them! So here we GO!!

Today we're doing something kind of special! Each time we have a Krafty Day Krop event, Kimmie produces a special edition stamp set for the participants! Everyone at this year's event LOVED the new COLOUR MY WORLD set which features the main image of Lexi colouring with her copic markers!! It also has TWO coordinating sentiments! This image can also be found on our NEW special edition TOTE BAGS!! We are also celebrating our past Krafty Day stamp sets today, so you'll see some of them along the way as well! They include The Krafty Stamper, Krafty Katastrophe and Best Friends!!


Are you planning to join us for our LIVE ONLINE RELEASE PARTY!!! Hope you can join us for all the fun and excitement and prizes on Saturday night beginning at 6pm EST!! Be sure to come hang out with the Krafty Girls and Guests! ALL the new stamp sets we're previewing this week, plus the tote bag, will be released at 7pm EST!

All the Krafty Girls and Guests listed below have lots of super FUN designs to show you featuring this awesome new stamp from Cheryl Grant and matching Tote Bag! And while you're hopping around, be sure to leave a comment at each and every stop because we are giving away a gift voucher!!! You could WIN some Krafty $$$ to spend at the Kraftin' Kimmie Stamps shop!!!! {This winner will be announced at the party!}

Happy hoppin'!


This is a card I made several years ago with Best Friends. LOVE this stamp and now I want to color them again today to see if there is much difference.


Tuesday, November 11, 2014

Papertake Weekly challenge - Two or Four legs

Hi everyone! Hope you're having a great start to your week! It's time for a new challenge at Papertake Weekly , and this week the challenge is Two or Four legs. That means your project has to have something that has either two or four legs. We are sponsored by the wonderful folks over at Whiff of Joy!  For my project this week, I used an adorable little lamb stamp that I had to look hard for. I received the cutest card from a friend that had this cutie pie on it, and then I had to go on a search! It took me a while, but I found the maker, and that led me to the stamp. It's by Azadi Eades, and I believe it's titled Dancing Sheep (but I'm not sure about that).


Please be sure to pop over to Papertake Weekly to see all the gorgeous creations by the design team, and then we'd love it if you'd grab your paper and glue and play along with us! Thanks for stopping by to see me today and hope to see you back again soon! Hugs!

Monday, November 10, 2014

Kraftin' Kimmie Stamps - Tips and Tuts


Welcome to another week of Krafty Tips and Tuts here at Kraftin' Kimmie Stamps! Each
week one of our fabulous Krafty Girls share a little post with some sort of tip or tutorial
for you and we hope you find them inspirational!!

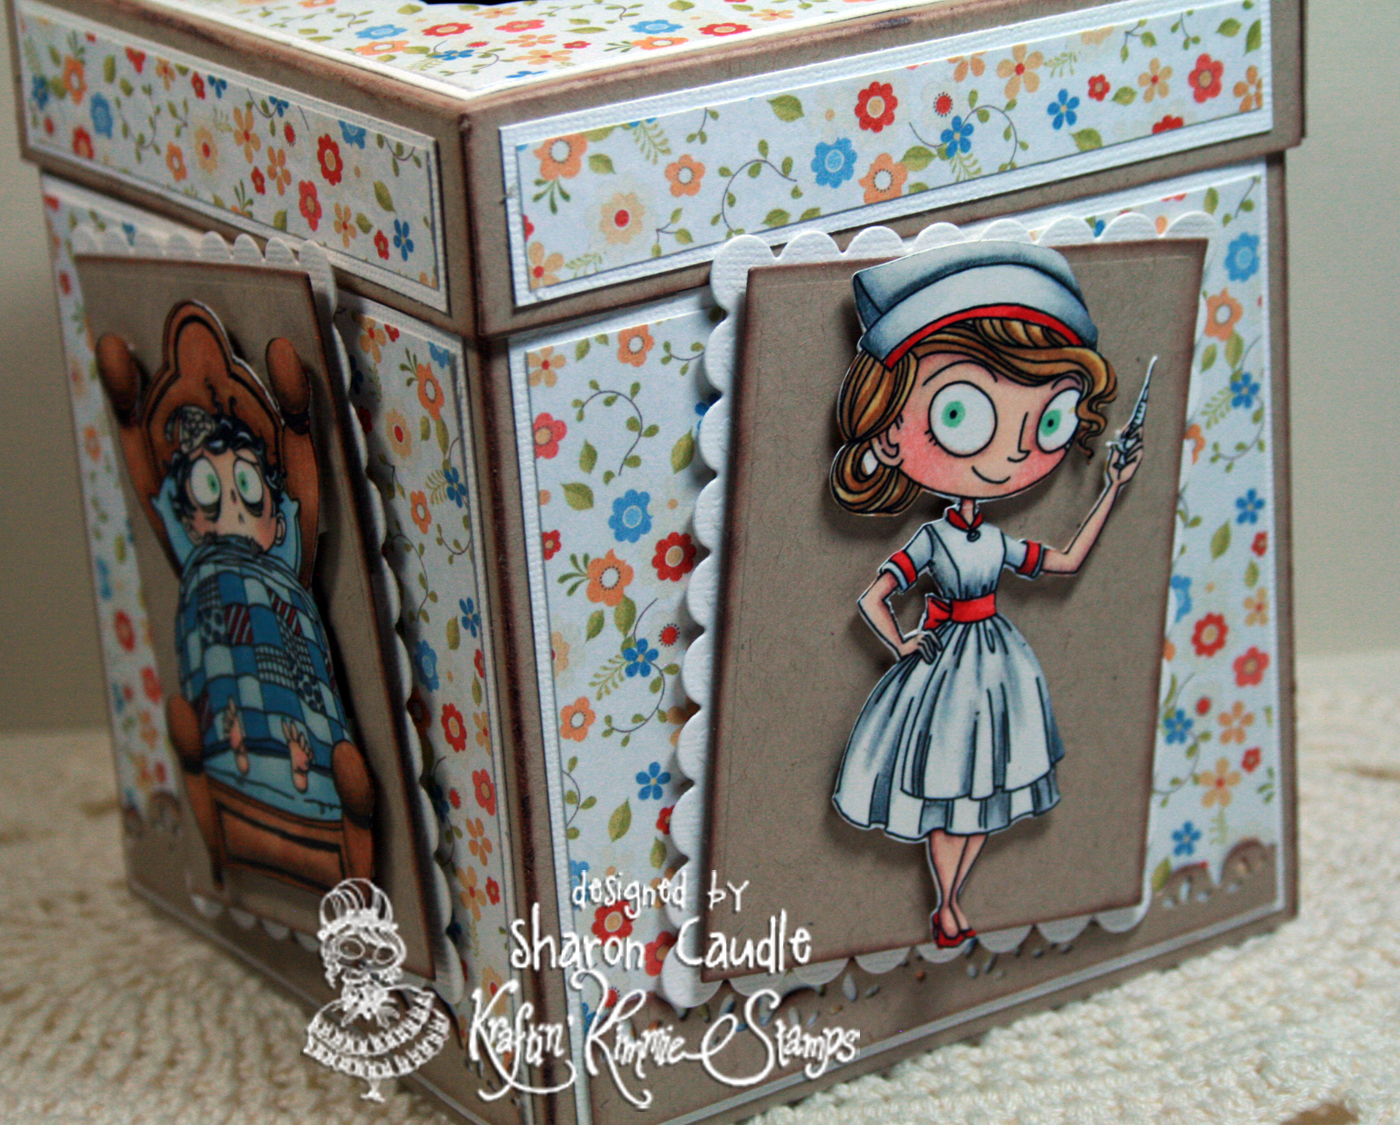
Hi! Sharon here with you today! .  It's November, and that usually means it's the season where people start reaching for the tissue box more often. I love making tissue box covers, so today I'll be sharing how I make them with you. I used kraft cardstock as a base because I like the strength.  For my box today, I used Nurse Nightingale and Under the Weather. I thought this would make a super cute box to put in a care package for a sick friend or family member.

Cut two pieces of Kraft cardstock measuring 9 1/2" x 5 1/8" inch (this will be the actual box).  Using a trimmer with a score blade or a score board, score these pieces at 1/2" and 5" ( 9 1/2" side goes against the top of your scoring tool)   Adhere the two pieces together to form a box by using a strong adhesive such as Sookwang tape on the 1/2" tabs. Be careful to get them straight.

For the lid, cut another piece of kraft cardstock at  6 9/16" square.  Using an oval die, cut a hole in the center of your lid for access to the tissues.  tip:  If you don't have a die cut machine large enough to fit the lid through it, just use your paper trimmer to cut out a large enough hole that will be bigger than the die cute you'll use on your layering pieces.  Score the lid at 1" on all four sides. Once that is done, you will have four corner pieces, Snip down one side of each corner like this. 

 
Fold and adhere all four corners tabs to make your lid. Then adhere the lid to the box so it's permanently affixed.

Now you get to decorate!! I like layers, so I used both a layer of cardstock and a layer of pattern paper on top. So you would need:

Four pieces of white cardstock cut at 4 1/4" x 4"
Four pieces of pattern paper cut at 4 1/8" x 3 7/8"

Adhere those to each side of the tissue box.

To finish the top of the box you will need:
one piece at 4 1/4" square in white cardstock
One piece at 4 1/8" square in your pattern paper.

Adhere those together and use any pretty die you'd like in the center to cut a hole for your tissues to dispense. Just make sure it's not larger than the hole you cut in your lid base.

You'll also want to decorate the lips of your lid, so cut:

Four pieces of white cardstock measuring 4 1/4" x 3/4"
Four pieces of pattern paper measuring 4 1/8" x 5/8"

I used petite scalloped Nestabilities for the image frames. Choosing the size that fit my tissue box the best, I die cut four white frames using the scalloped die, and four straight edge frames using the kraft cardstock.

Color the images you wish to use. I used Nurse Nightingale and Under the Weather, and then fussy cut them out. I then applied foam tape to the back of the image, the back of the kraft layer, and then also to the back of the white layer. So can you tell I like to add dimension? :)  I don't like having everything exactly square, so I then adhered the image panes to the box base at a little bit of an angle just to mix it up a little. If you do that, be sure not to adhere each of the images going the same way If you tilt one a little to the left, tilt the next one a little to the right.

Feel free to add punched borders, trim, ribbon, anything you'd like!  This is the result of the directions above. I did add a little scalloped border along the bottom side panels.


So do you think these images are a perfect match for a tissue box like I do? If so, you can order them here! Have fun and if you choose to make one, I hope you share it with us!


Saturday, November 8, 2014

Hello AI Fans!!

I don't know how it goes in your household, but the onslaught of cooler weather certainly does not mean the end of grilling season here! My hubby will grill year round as long as he can get the grill hot! So this Grill Father Set  from Art Impressions is perfect for him.  Maybe I'll have to make one with a snow background sometime. LOL!  I can always find the perfect stamp at Art Impressions! They're so full of personality and FUN!!


All the die cuts were done with the Silhouette


Copics used:
E11, 04, 00, 000, R20, R35, 37, 39; E33, 35, 37; YR23, 24, 27;  YR12, 14, 16, 18, BG10, 11,  C0, 1, 3,  T1, 2, Blender


Thanks so much for stopping by to see me today and hope to see you back again soon! Hugs!
 

Thursday, November 6, 2014

New Art Impressions Zoo Babies and blog hop!!!

Hi everyone!!  It's time for challenge #148 at Art Impressions, and we are also celebrating the launch of the new ZOO BABIES with a blog hop! 

http://www.artimpressions.com/ListProds.asp?Cat=+++++++++++++++WHATS+NEW%3F&SubCat=Zoo+Babies

 
 If you've arrived here from the oh so talented Renee Matarese, then you're right on track! If not, be sure to start at the Art Impressions Blog so you don't miss out on a single thing!  
 
I used the adorable Dream Big Set (sku# 4533) and created two different projects. First a card with this sweet little ellie colored with Copic markers!!


Supplies:
Dream Big Set from Art Impressions
papers: We R Memory Keepers Baby Mine
card shape and banner cut via Silhouette Cameo
border die - Magnolia
image frame - Spellbinders
doily - The Lovely View from Little Darlings Rubber Stamps
May Arts silk ribbon


Next project is a picture frame with a pic of my granddaughter Sophie who just turned one.


The frame and number 1 with banners were cut using the Silhouette.
 
Now it's time to hop on to see the talented Sherry Eckblad to see what yummy project she has for your pleasure!
 
I hope you've enjoyed hopping with us today, and can't wait to see your creations for the new challenge!  hugs!!

Tuesday, November 4, 2014

Papertake Weekly Anything Goes


Hey everyone!! Hope you're having an awesome start to your week! It's Tuesday and that means it's time for a new challenge over at Papertake Weekly! Since it's the first Tuesday in the month (can you believe it's NOVEMBER??!!!!) that means it's anything goes!! Of course we always give you an optional part to the challenge to, so the option this week is to include sparkle or glitter.  We are being sponsored by the amazing folks over at Lili of the Valley. 

This card was for my little granddaughter Sophie who turned one recently. Time goes by way too quickly for me anymore.


Please be sure to pop over to Papertake Weekly to check out all the gorgeous creations by the design team, and then we'd love it if you'd grab your paper and glue and play along with us!! Thanks so much for stopping by to see me today and hope to see you back again soon! Hugs!


Supplies:
image: Wild Rose Studio colored with Copic markers
papers: WeR Memory Keepers Baby Mine
shaped car and the number one were cut with the Silhouette
May Arts silk ribbon
button from stash
Memory Thread
Martha Stewart border punch
Spellbinders circle and petite scalloped circle dies

Saturday, November 1, 2014

Trick or Treat set from Art Impressions

Hello AI fans!!

Hope you all had a wonderful Halloween! We didn't get many kids this year, so we've got a lot of candy left over. It will be put in the grandkids buckets this afternoon!! LOL  So being in the Halloween spirit, I made a card featuring this too cute to spook couple TRICK OR TREAT SET by Art Impressions from the new Halloween sets for 2014! . LOVE this couple!! (do I really say that about all the stamps?) Oh well...it's true! :)

 
I used the Silhouette to cut out the "Boo".


Copics used: YR02, 04, 07, 09;  YG21, 23, 11, 13, 17;  BV02, 04, 00; 
W0, 1, 3, 4;  E95, 97, 99; 000, 00, 04, 11;  R20


Now for a little personal stuff....wanna see my lil' punkin and ladybug granddaughters?  :)

This is Vivi (2 months old)

 
And this is Sophie (1 year old today)


Thanks so much for stopping by today and hope you have some time to get crafty today!