Thursday, May 14, 2009

Three Clovers Designs Thursday challenge - May Flowers and Cute Card Thursdays too!


EDIT - Sorry, I forgot to list the information on the flower stamp. It's Daisy Curls by Stampendous. Just click on the name. I've linked it to the stamp at Addicted To Rubber Stamping. Also - Thank you Claudia for leading me over to Cute Card Thursday!!

Happy Friday Eve!! It's Thursday and that means it's time to reveal the new challenge for Three Clover Designs. This week, Kerry is asking for May Flowers. I LOVE springtime with all the beautiful flowers and warmer weather! So I started by choosing this cute paper by My Mind's Eye with all the little flowers.


I fell in love with this flower stamp the moment I saw my friend Nikki use it last year! I had to immediately purchase it, and this is actually the first time I inked it up. I can't believe it took me this long to use it!! I stamped it several times and layered the flowers with dimensional tape.
I cut the word "hi" with my Expression machine and the Hello Kitty font cartridge. I cut it out six times with my Bazzill cardstock, and created the faux chipboard letters. Love the chunkiness of it!

I bordered the flower panel with strips of apron lace I got with my Martha Stewart border punch. I'm so addicted to those border punches!! Somebody stop me!!! I added some dew drops in the center of the flowers.


That's it for today! Please be sure and visit Three Clover Thursdays to see the fabulous projects the rest of the Inspiration Team came up with! We'd love it if you would join in and play along with us!! Thanks so much for stopping by to visit, and hope to see you back again soon! HUGS!

Sunday, May 10, 2009

Bitten By The Bug challenge - smiley or frown face

It's Sunday night, and that means it's time to reveal a new challenge for Bitten By The Bug! This week, Regina is challenging you to use either the smiley face or the frowny face from the Cricut Wild Card Cartridge. I had no idea what the heck I was going to do with a smiley face, so I just sat down and started cutting. It just all came about pretty naturally as I flipped through the handbook for the cartridge. All of the cuts are from the Wild Card Cart.
The word smile is cut out five different times and glued together for faux chipboard. I really love doing that technique! Since there is no shadow feature available on that cartridge, I simply cut the top layer in the yellow color I wanted it in, and then offset it a little from the red base. This gives the illusion of having the shadow.

This cute little card will be for sale in my etsy shop. Thanks for stopping by to see me today, and hope to see you back again soon! Don't forget to visit Bitten By The Bug to see all the wonderful ways you can use this one little cut from this amazing cartridge! We'd truly love it if you would play along with the challenge! HUGS!


Copic tutorial - face and Auburn hair

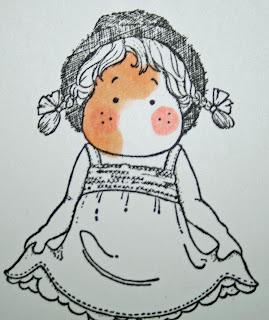
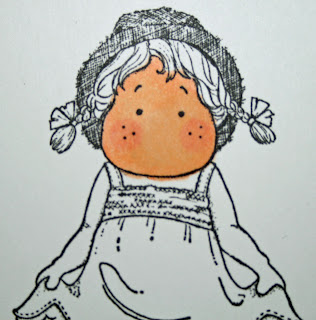
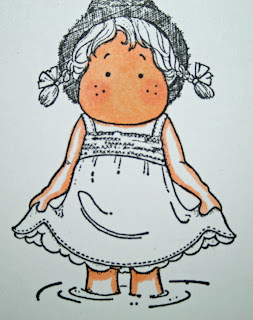
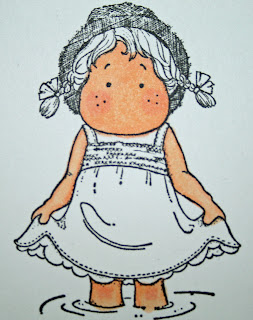
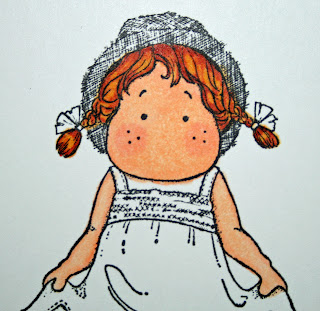
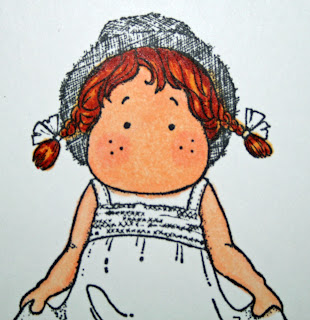
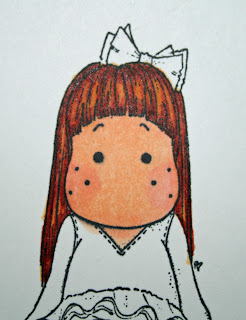
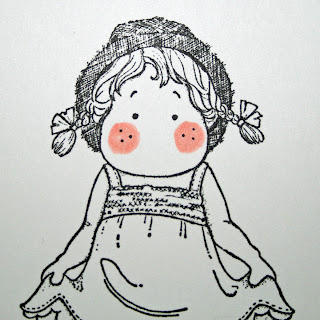
This is my first attempt at a tutorial for the copic markers. I get a lot of questions on how I get the Auburn colored hair that is my favorite. In these pictures, I used five colors of Copic markers. For the skin, I used E00, E02, and R20. For the hair, I used YR21 Cream, and E08 Brown. I am simply showing you the way I personally color my stamps. There are lots of other ways out there to achieve a wonderful finish to your poject. I must give credit to some of the other wonderful artists out there, that have taught me so much. Two of them in particular - Claudia Rosa and Suzanne Dean. They have some amazing Copic tutorials on their blogs and I highly recommend you watch them. Ok, on to my process. Don't forget that you can click on the photos to look at them up close. I apologize in advance for going outside of some of the lines. I didn't use my color blender to remove my messes.

First thing I do is apply R20 to the cheeks. If you apply the R20 first, you don't end up with a "halo" effect around your cheek color when you're done.


I then apply E02 to shade around the face.
Blend out with E00. I shade a little at a time. It seems to blend a little easier if you can get to it before it has a chance to dry completely. You can always still blend, even after it's dry, it's just takes a little longer.


Take the shading around the rest of the face with E02


Finish blending with E00


Apply shading to arms and legs


Apply R20 to knees


Blend out with E00


Skin is done, now it's time to move onto the hair. I use the color Cream, and completely color the hair.

Take the brown and color the crown, the edges, and the hair lines


With your cream color, blend, blend, blend....


Add some brown in the same spots...crown, edges, and lines

Again with your cream...blend, blend, and blend some more


Always finish by blending out with the cream. Here she is with completed skin and hair


Here's one more sample with a Tilda that shows lots of skin. No commentary on this one. Just pictures. I used the same five colors as last time.


That's it for tonight. I sure hope I was able to answer the questions you've had. Thanks so much for visiting and have a wonderful day! HUGS!

Saturday, May 9, 2009

Thinking of you with Tilda on a quilt - Friday Sketchers


In case you couldn't tell, I just love making scenes with my Magnolia images I get from Magnolia-licious! I used four different stamps with this one. The old oak tree, the quilt, that cute little birdie flying in the sky, and Dreamy Tilda. I made this with the Friday Sketchers sketch for this week.


The stamps are all colored with my Copic markers. There's a pic of the markers I used at the bottom of this post. The DP is DCWV Sweet stack, so some of the paper is glittery.


I added some Prima flowers with some Making Memories brads. The grassy portion was just colored in and I used a couple of little grassy stamps from a stamp set from Our Craft Lounge. I colored in the sky with my Copic airbrushing system.


That's it for today! To all the Mom's out there, as well as to all the Mother figures out there, I wish you all a very Happy Mother's Day. Thanks for visiting, and enjoy the weekend! Hope to see you back again soon! HUGS!


Thursday, May 7, 2009

Tilda butterfly challenge

Heehee...what can I say?? Those of you that know me...know this is pure me. I LOVE to play with words and make punny cards. Diana over at Magnolia-licious issued us a challenge to turn any Tilda into a butterfly. I immediately thought of this ice/ballet princess from the pink collection which you can purchase from Magnolia-licious (and with free shipping to the US and Canada too!!) So I went to work and cut the butterfly wings with my Cricut Expression machine and the Tinkerbell cart. The butterfly net came from the Pooh and Friends cart, and the daisy came from the Walk In My Garden cartridge.

Tilda is colored with Copics, and the wings are covered in stickles. We would really love it if you would join in on this challenge with us. It really is a lot of fun! The challenge is going on the entire month of May. So grab your favorite set of butterfly wings and your favorite Tilda, and when you're done with your card, just email a pic of it to Diana at ladydian@shaw.ca


Hope you all have a wonderful Friday! I'm off work, and have a Mother's Day breakfast with my daughter and grandson at his preschool in the morning, then my hubby's birthday dinner tomorrow night with lots of errand running in between. We're fixing him Cajun pepper shrimp for dinner. One of our favorites. YUMMY!! Thanks for stopping by to see me today, and hope to see you back again soon! HUGS!
Three Clovers Designs Thursday challenge

Happy Thursday everyone!! That means the end of the week is almost here, and it also means it's time for another challenge over at Three Clover Designs! This week, Kerry asked us to make a card for Mom or women, and use either ribbon or lace. Perfect timing for Mother's Day, although the card I made could be used any day of the year. I used some of my favorite paper, Basic Grey Boxer line, and the cardstock is Bazzill. That cute stamp is from The Cutting Cafe'. It's in a set called All About Mom that has tons of stamps that can be used year round!


I just printed it out at the size I wanted, and then colored them with my copic markers. I used E08, B21, and for the shadow lines, I used BV20. The scalloped background was cut out with my Expressions machine and the Storybook cartridge.
That's it for today! We'd love it if you would join us in the challenge over at Three Clover Designs! Wait until you see the fabulous creations the rest of the inspiration team came up with! There is some beautiful work to be seen!
OH! I wanted to let you know that I get asked a lot of questions about how I use my copic markers to get Tilda's hair the shade of Auburn red that I love so much. So I'm going to attempt a tutorial on how I do it. I hope to have it posted this weekend. Thanks for stopping by to see me today, and hope to see you back again soon! Have a great day!

Tuesday, May 5, 2009

Summer fun featuring Tilda by Magnolia

Happy Hump Day!!! Gotta love when we make it Wednesday....Friday is getting closer every minute. And the best part about this week....I took Friday and Monday off of work. A FOUR day weekend! WOOHOO!!!! Can you feel the floor shaking from me doing a happy dance?? LOL!

I'm trying to use up some of my paper scraps, and that's exactly what this is. I did some card sets with ths paper, so I've got lots of pieces left over. I apologize in advance how much you'll probably be seeing this paper crop up in my cards. At least it's cute paper, huh?? The Magnolia stamps I used are from Magnolia-licious. This is Tilda in the sea. Isn't she the cutest? I just love her straw hat. I masked her off and stamped the sea background behind her.

I colored it all with my copic markers and then cut it out with my nesties. The image is popped up from the card base with dimensional tape. The ribbon is one of those tiny little spools from Michael's, and the tag was cut with a cuttlebug die.


I also used a Martha Stewart border punch. That's it for this one. I put it up for sale in my etsy shop. Be sure and visit Magnolia-licious for all of your Magnolia stamp needs! Diana gives free shipping on every order to the US and Canada, offers special discount coupons, and sends extra goodies with your order!


Thanks so much for stopping by to see me today, and I sure hope to see you back again soon! Have a great day!

Sunday, May 3, 2009

Congrats on the new baby - Peggy Loves Vintage

When you need an adorable card fast, there's noplace better to turn, than Peggy Loves Vintage!! I will be the first one to admit that it usually takes me hours and hours to make a card. I'm just SLOW!
But when I use the fabulous vintage images from Peggy, I can usually pop a card out in less than 30 minutes. LOTS of times in under 15!!!! This cute image came from her New Baby cd. LOVE IT!!!

My good friend DeeDee gave me the directions on how to make this card and I love it!! I simply cut a sheet of cardstock to 8 1/2" x 5 1/2". Then scored at 2 1/8" in from each side and fold in. The card measures a standard A2 ( 4 1/4" x 5 1/2") I cut the scalloped square behind the image with my Cricut Expression and the Storybook Cartridge.


I glued a blue button into each corner and added a little blue ribbon, and then added a larger scalloped square on the inside of the card for writing. This cute little card will soon be for sale in my etsy shop.


If you love vintage images, be sure and visit Peggy's shop! You'll be happy that you did! The selections are unbelievable!
Thanks for visiting me today, and hope to see you back again soon! HUGS!